For those of you that didn’t read my post on Friday, I’m building a lake house here in Texas. This is an experiment in sharing, as we normally don’t get too personal here on BLTD. However, for such a large project it’d be a shame to not share some of my lessons learned. So, on to the first building stage: concept.
Initially we had thought we would buy a small cabin or fixer-upper, as we wanted a weekend getaway and not too much fuss. I looked and looked, but that real estate search was a major disappointment. Everything in our budget made my eyes bleed- and I can see potential in almost anything. We had found one small-ish cabin/house, but it looked like it would require a total gut job and it was snapped up before I even heard back from the realtor. So we bought a lot instead, and planned to save to build a weekend home for us, as well as our visiting friends and our extended family. I’ve always been interested in architecture and design (obviously), so I had it in my head that I’d build a small model to show architects what we sort of wanted during the interview stage.
At this point in time, our budget for the house was modest. We were thinking of spending what a normal sized town home costs here in Houston, tops. We had the idea in our heads of separate structures: main house, painting studio, and guest suite or garage. Both my husband and I are fans of simple, modern architecture, so we thought it shouldn’t be too complicated.

This is a very basic and rough model, not to scale (I cut it out of Balsa wood, which is super soft and easy to cut). I’m a little embarrassed by it now, as it’s much tinier than a correctly scaled model. But, whatever, it was my first attempt, and has a simple sort of charm. Our lot has a steep incline towards the road, so that limited us quite a bit in terms of driveway and garage placement. We preferred to keep the garage and driveway near the road to avoid a huge swath of a drive bisecting the lot in two, not to mention a rather steep entrance/exit.
After meeting with architects, we settled on a firm we could afford and that we thought could execute our vision within our stated budget. When we saw the architect’s first sketches, it was like Christmas morning and the Fourth of July, all in one. Our house! Drawn by an architect! It’s real! And then, the next thought, can we afford it?? Building a house is expensive, everybody knows that. Seeing it drawn out make it look more grand, huge even, and made me realize the slope was a bigger deal than I had thought. I’ll not share the architect’s sketches, as I want to keep this whole story purely focused on my side of things. Sorry.
Drawings passed back and forth, with changes to the entrance location, adding windows, changing doorways, etc. Some things we had to have because of deed restrictions, so take care of checking there first if you prefer to fly unfettered in your design process. Our architect was patient with us (with me mostly, as I was the one who wanted the changes), and stood his ground on a few design elements that I was willing to sacrifice for my personal view on aesthetics and, of course, cost. Several revisions later and after several more months, we settled on a floor plan and elevations that we liked. Next came a scaled model based on the drawings to give us a better idea of how it would sit on the land.
Some architects might provide a scaled model for you, but I like making models, as you now know, so I did it myself. I first created a version of our lot with correct elevation lines. I just printed out the lot survey and used the lines to cut cardboard to match each elevation, then I glued it all together. Next, I printed out the architect’s drawings to scale, and then spent a lot of time cutting out each wall in Basswood (I bought all my supplies from an art supply store that carried architectural modeling supplies, fyi). Then I spent more time gluing it all together. I’m guessing it took a week or so of afternoons. It was fun.

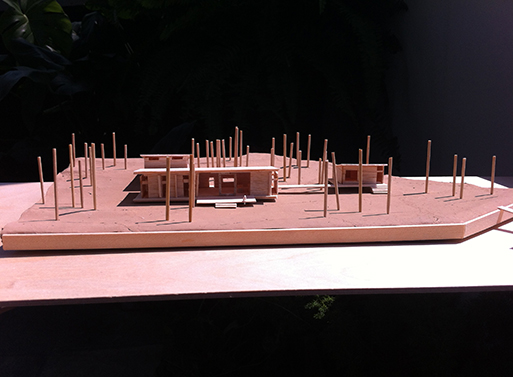
Ta-da! The finished model. It’s huge, so much bigger than the first model, in scale and in plan square footage. The house takes up almost the whole lot. I was pretty happy with this second model at first, though now all I can see is how I skimped on the foundation portion (more on that later) and more than a few uneven cuts. It’s not a professional model, but it sure helped us figure out how it would look and feel, and enabled us to make final design decisions. There’s three separate structures, with two connected by a breezeway. The garage/guest house is near the road, with the main house lower down near the water’s edge. The roofs lift off to show the inside walls, because how in the world could I build a model without the correct floor plan? As if.

This view shows the elevation difference between the structures in relation to the road. Landscaping won’t be easy.

Next post on the Lake House I’ll focus on the next stage: picking stuff out for the house and realizing how expensive everything is (and how overwhelming it can be).
Tags: lake house