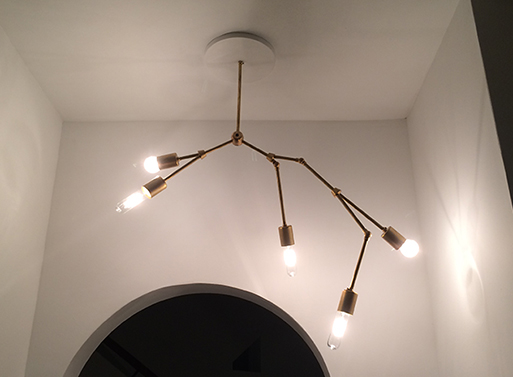
How cool does this chandelier look? Pretty cool, right? Now, what if I told you I made this guy with my own two hands? Yep, I finally got around to making a DIY Lindsey Adelman Chandelier. And, yes, it was difficult at times- more than a few swear words were released into the ether- but so well worth it. Details below.
I’ll not bore you with all the steps or the list of supplies, as Lindsey Adelman has all that information available on her website. Luckily, Grand Brass Lamp Parts now sells the complete kit ($140) for everything you’ll need, so you won’t need to add each and every individual part to your cart. However, I will bore you with the trials and tribulations of installation.
I highly recommend purchasing the additional brass canopy BAFL05/NW, crossbar CB1/8, and slip ring SR0-3/8 if you don’t already have a ceiling kit on hand. I did not purchase these items, and spent more time than I’d like messing with and hunting down alternative options.

Like I said before, all the instructions are available via Adelman’s website. All went smoothly with assembly; I had no issues with threading the wires through the arms or making everything fit together. If you follow the instructions, you’ll be fine.
The hard part for me was hanging the chandelier. I had originally planned to hang the fixture above our kitchen table, yet after we replaced all the old recessed ceiling lights with the new LED downlights, it was decided that the chandelier should go above our bar area, where an inexpensive IKEA ceiling light was quietly trying to survive the culling. Out it went, only for me to find out that there was no electrical ceiling box to house the wires. Whoever installed the light fixture had simply attached the light to the adjacent ceiling joist through the sheetrock, forgoing a proper electrical box. Laziness.
I decided to be lazy too and hang the chandelier to the joist, and just cover up the big hole where the box should be with a custom made ceiling medallion. That was a mistake. Not the medallion (it turned out well but took too much time to make), but hanging the light directly to the joist… twisting around the chandelier in order to get the wiring properly attached whilst making sure the medallion would sit snug to the ceiling without enough room was not fun.
Remember when I said to get that brass canopy and slip ring? Here’s where I wished I had foreseen the need for these two items, as it would have saved me a lot of time. Twisting around the chandelier caused the central white wire hub connection within the chandelier to come loose, thus when I had everything up and looking nice, the bulbs would not go on despite a live electric current to each and every outlet. Insert picture of me cursing like a sailor. No surprise, as I wasn’t installing it correctly.
It all came down, wires reconnected in the central plug, lesson learned, let’s do it right. I finally found a brass slip ring in the right size from a very nice man working in a consignment lighting shop here in Houston, and he gave it to me for free. $10 shipping from Grand Brass for a 65 cent part just seemed silly, though after visiting three different lighting shops over a two day timespan, not so much.
Moving on, now to a proper electrical box to house wires. Hire an electrician; that’s the best way to go, no doubt about it. I didn’t, because I like learning about electrical issues, how to fix, etc. So, how does one install an electrical box and light support when there’s nothing except an adjacent joist? I didn’t want to tear up the sheetrock to install a crossbar. I was thankfully saved from the conundrum thanks to a ceiling fan brace with box:

Image from Family Handyman, as I didn’t stop to take a picture of the whole thing.
It was just the thing to house the wires safely and provide support for the light, and, as it adjusts to span the width between joists, there was no need to take out sheetrock to screw in a brace or crossbar. So, up the brace went, screwed tight, sheetrock trimmed, electrical box installed and wires safely threaded through.
Finally, the light. Again. Up it went, connected and supported properly, with my lovely handmade ceiling medallion and (free) brass slip ring to cover up the ugly. It looked great, except the bulbs were just a little too bright for my taste, so I replaced the light switch with a dimmer switch- now it can be on a high, mid, or low setting.

There it is, that’s my story. If you have specific questions/comments, you might want to email me (contactATbetterlivingthroughdesignDOTcom), because I only read the FB comments when there’s nothing else to do.
Available from Grand Brass Lamp Parts, 140.00.


