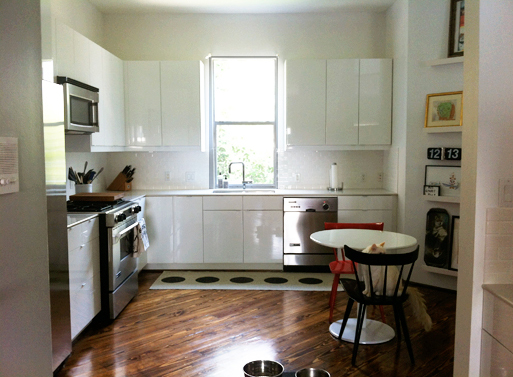
If you’ve never completed a kitchen remodel, you and I had something in common 7 weeks ago. Fast forward to last week, to my mostly new kitchen (shown above) which sports white shiny cabinets, an almost white Silestone countertop and an off white porcelain backsplash. White, white, white. If you’re curious as to how the project progressed, you’ll find more pictures and commentary below.

The ‘before’ photo. There wasn’t anything wrong with the layout, but there were a bunch of small things that were starting to get on my (and my husband’s) nerves.
1.) The cabinets were old Ikea cabinets installed by the builder (c. 1990s). Lots of shelves, sure, but shelves aren’t always great for organizing larger pots and pans and such. The cabinets were also starting to look a little yellowish a few years ago, so I thought that dry erase board paint would make them shiny and white (and maybe even fun to write on). Sounds good in theory, but dry erase board paint yellows after some time too, so, after 3+ years, the cabinets were looking even worse than before.
2.) The builder had put in a brown/pink granite countertop. I don’t care how many people ooo and aah over granite, the brown/pink color was not my preferred color. It was dark-ish, so it seemed to suck up a lot of the light.
3.) We had a lot of stuff out on the counters due to lack of appropriate storage space. I didn’t straighten the kitchen up when I took this photo, so you can see there’s several small appliances, plus a big microwave and a dishtowel for drying anything not going in the dishwasher. Clutter on the counters = not a lot of workspace.
4.) Years ago we thought that a deep blue/green paint was a good wall color for above the cabinets. It wasn’t. It sucked up a lot of light too, and paired up with the brown/pink granite, the kitchen felt really dark compared to the rest of the house, despite having its own window and overflow light from the stairs (around the corner on the right).
4.) The sink was double, but one side was shallow and smaller. Large vases didn’t fit under the faucet, nor was it easy to wash and rinse larger dishes when needed.
5.) We love our stove, but the built in extractor fan doesn’t do a great job. We needed additional ventilation as we did not want to completely replace our stove.
All in all, these were small things. The kitchen wasn’t horrible, after all, but there was definitely room for improvement. So, the renovation began. We opted to hire a contractor for most of the work because we didn’t want to do it ourselves and we had the budget.
Note: I used my iPhone to take all these pictures, so forgive the graininess and, in some cases, alterations in brightness.

Day 1: Cabinets, granite, sink, backsplash torn out. Salvageable pieces donated. Large appliances temporarily moved to the side.

Day 2-4: Drywall patched and mudded.

Another shot of drywall patched. The bar area is to the right, and the staircase is to the right of the temporarily placed appliances. You can see the little bit of light that comes in from the staircase reflected on the side of the stove.
Day 5: Wall surface was painted/primed.

Day 7-9: Cabinets installed. We went with Ikea again, because they’ve improved their offerings and it’s a heck of a lot more affordable than getting custom work done. We had an IKEA approved professional installer figure out the best arrangement to fit our kitchen needs (similar to before, yet improved) and then their team built and installed the cabinets. We could have done this ourselves, but we decided to leave it to the pros to save ourselves time and a significant amount of frustration and profanity.

We chose white Akurum cabinets with white Abstrakt doors. INTEGRAL door dampers ensure a soft close, and GRIP handles fit the minimal look we were after. We also opted for the FRAMTID microwave, $249.00, to be installed above the cooktop, which frees up counter space and allows for extra ventilation.
Day 13: Measurements for future Silestone countertops taken.
Day 17: IKEA installer returns to do a few custom fittings around fridge and dishwasher.
Day 18: Our contractor installs temporary plywood decking along with a temporary sink as the countertops are taking longer than originally estimated. No photo for this because I was out of town for the majority of the time that follows. However, use your imagination (it wasn’t pretty).
And then…

Day 40: Countertops installed. It took a little longer than estimated because countertop vendor was new. I badly wanted a dark countertop (like this one or as in the kitchen of Michael Kors (designed by Glenn Gissler), but it wasn’t prudent considering the lighting issue.
Day 41-45 (minus weekend): Porcelain tile backsplash installed. White again for simplicity and to increase brightness.

Day 46: Ta-da, the mostly finished kitchen. There’s still the under cabinet lighting to be installed, but that won’t matter much for these pictures.

We chose a Vigo 30 in. x 17 in. Double Bowl Undermount Kitchen Sink for $414.00 (includes two grids and two strainers). The depth is almost 10 inches, so it’s perfect for larger pots and vases. Our faucet is the same one we had from before, GROHE 32319000 Minta Dual Spray Pull Down, ~$280.00.

Another shot of the cabinets, countertop, and backsplash.

A final shot of the whole kitchen with bar area to the right. The room feels brighter and we’re quite pleased with the new cabinets, especially as they’ve allowed us to better store our small kitchen appliances. I’m also surprised at just how nice the soft-close doors are; it’s a very worthwhile (and low cost) option to consider should you choose to redo your own kitchen or bathroom.
Also, if anyone is interested in the name of the contractor we used and/or the numbers for the IKEA installers (remember, this is in Houston), I’m happy to share. Just fill out the contact form and I’ll get back to you within a few days.